
Alesia’s Art Activities
Alesia Lacina has a long history of arts education in Grinnell. Here are some of her favorite art activities for you!
Silly Springtime Tree


Supplies: Recycled materials + plastic bottles + toothpaste boxes + cereal boxes + paper towel rolls + masking tape + scissors + colored paper + magazines + paint + glue + paper sacks
How to:
1) Collect materials to be recycled. (Make sure they have been cleaned.)
2) Build a tree sculpture by taping the recycled materials together.
3) Paper mache with colored paper, magazines, paper sacks or tissue paper.
Or you can paper mache with newsprint and then paint.
Brown paper sacks work well for the trunk of the tree. Make tree blossoms using the instructions from Bouquet Helmet Flower Power project.
Crazy Abstract Sculpture

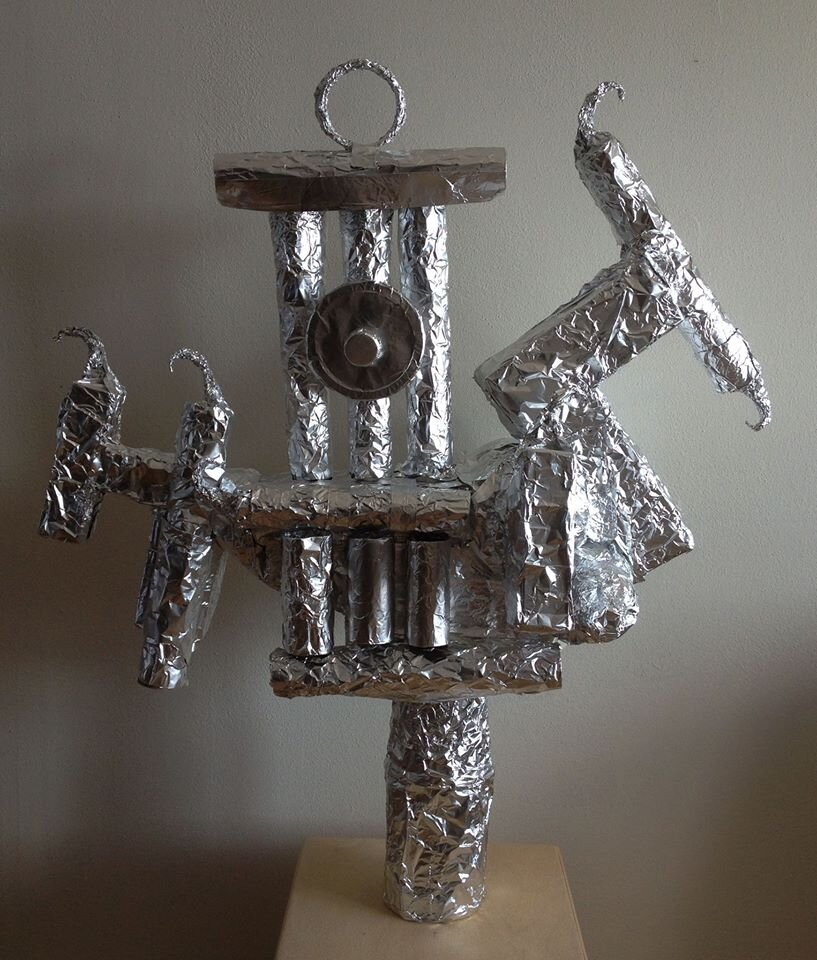
(Have fun--there are no mistakes!)
Supplies: recycled materials + plastic bottles + toothpaste boxes + cereal boxes + paper towel rolls + masking tape + scissors + aluminum foil
How to:
1) Collect materials to be recycled. (Make sure they have been cleaned.)
2) Build a sculpture by taping the recycled materials together.
3) Cover with aluminum foil. As an alternate to foil, paper mache and then paint.
Crazy Eggs

(Have fun--there are no mistakes!)
Supplies: balloon+white glue (diluted a little with water)+paint brush+scissors+newsprint+wrapping paper/magazines/colored paper for decorating egg+marker+string+masking tape to attach string
How to:
1) Blow up balloon to size of a large egg and tie it shut.
2) Tie a string around the knot to hang onto while brushing glue onto the surface of the egg.
3) Cut small pieces of plain paper or newsprint.
4) While holding the string brush a small part of the egg with glue.
5) Place paper onto egg and then go over the paper with glue.
6) Continue until you have covered the whole egg with two layers of the plain paper or newsprint. Hang egg to dry a little.
7) Cut small pieces of the wrapping paper, magazine or colored paper to decorate the egg.
8) Place paper onto egg and then go over the paper with glue.
9) Continue until you have covered the egg.
10) Hang the egg from the string until it dries.
11) Pop balloon with scissors at the place where the balloon was tied and remove balloon and string.
12) Attach a looped string to top of the egg with tape. (The string is for hanging in a window or on a tree. You may choose not to include a string.)
13) Glue paper over the tape and top opening to cover.
14) Draw on them if you like.
Note: Sometimes the balloon will lose air while drying. Don't worry. After the egg has dried and you remove the balloon, you can reshape the egg by reaching inside with your finger or a pencil.

Life-sized Marionettes
Materials
Recyclables
Zip ties
Hole punching tool
Scissors
Acrylic paint/brushes
Miscellaneous decorating supplies
Masking tape
Instructions
1. Lay out recyclables to form a creature. If any of the pieces have flaps like egg cartons, you may want to close them with masking tape.
2. Using the hole punching tool, poke medium sized holes in the recyclables where you want the pieces to be connected. It is best to do this part for kids, as it can be difficult to pierce through some recyclables, especially plastics.
3. Connect the pieces by threading zip ties through the holes and locking them. Keep the zip ties loose. Trim the extra length.
4. Paint your creature.
5. When dry, decorate it with anything you want! Then, go set it up in a chair. It might startle some people.

Clay Landscapes
Landscapes before glazing and final firing
Materials
Clay rolled flat and in chunks
Flat boards (ours are 4"x12") for a surface
Instructions
Lay the flat piece of clay on the flat board for stability. Use chunks of clay to build. Create a landscape. It could include things such as buildings, walls, trees, and statues.
Fire in a kiln, glaze, and fire again.
Tips
Make sure that all the pieces are very well attached and there are no fragile parts. They easily break off.