

Alesia’s Art Activities
Alesia Lacina has a long history of arts education in Grinnell. Here are some of her favorite art activities for you!
PLAY DAY | CAST OF CHARACTERS + THEATRE BOX ARTBOX THEATRE PUPPETS
Thanks to Studio 6 Students + Mary Emge!


Supplies: plastic bottles + markers + glue stick + clear tape or masking tape + scissors + fabric, old gloves or socks + pipe cleaners + glue gun + aluminum foil + beads + white glue + buttons + bells + dried beans + tissue paper + pom poms + magazines + googly eyes + fun art supplies around the house
How to:
1) Find a plastic bottle.
2) Make aluminum foil horns, nose and/or hat. Attach them to the bottle with masking tape or glue gun.
3) Glue tissue paper or magazines to bottle. Or you can paper mache and then paint.
4) To create the body, make a pattern using your hand. Using the pattern, cut out material and sew or glue. Or use a glove.
5) Glue or tape the body to the bottom of the bottle.
Write a play. Add music. Entertain your family.
Optional: Find a large box similar to the one in the photo. Cut out a rectangle in front. Open the back so the flaps support the theatre upright. Set the box on a table. You now have a theatre. Color and/or decorate the theatre.
3-D Collage Helmet


Supplies: cereal boxes + masking tape + invisible tape + glue stick + scissors + X-Acto knife + straws + magazines
Build a helmet using the “How to make a helmet” instructions below, then:
1) Collect pictures from magazines.
2) You will be placing pictures on the back and front of helmet with tape.
3) Find pictures to attach to straws with tape.
4) Place them in the middle and sides of your helmet with tape.
5) Use as many pictures attached to straws as you would like.
Take a photo and post them, send to friends or to me!
How to make a helmet:
1) Open top and bottom of two cereal boxes. Find the side seam on each box. Open up and flatten.
2) Cut off extra flaps.
3) Overlap the two boxes about an inch. Tape the seam with masking tape on both sides. This makes one large piece.
4) Take the piece and wrap it around your head to make a cylinder. Overlap at least 1 inch. You can cut off some if you have too much overlap. Tape with masking tape inside and out. (For larger heads you may need more that two boxes.)
5) Cut out one long or two short rectangles for eyes. As an option, you can cut a piece of clear plastic and put it inside the helmet over the eye openings as a shield.
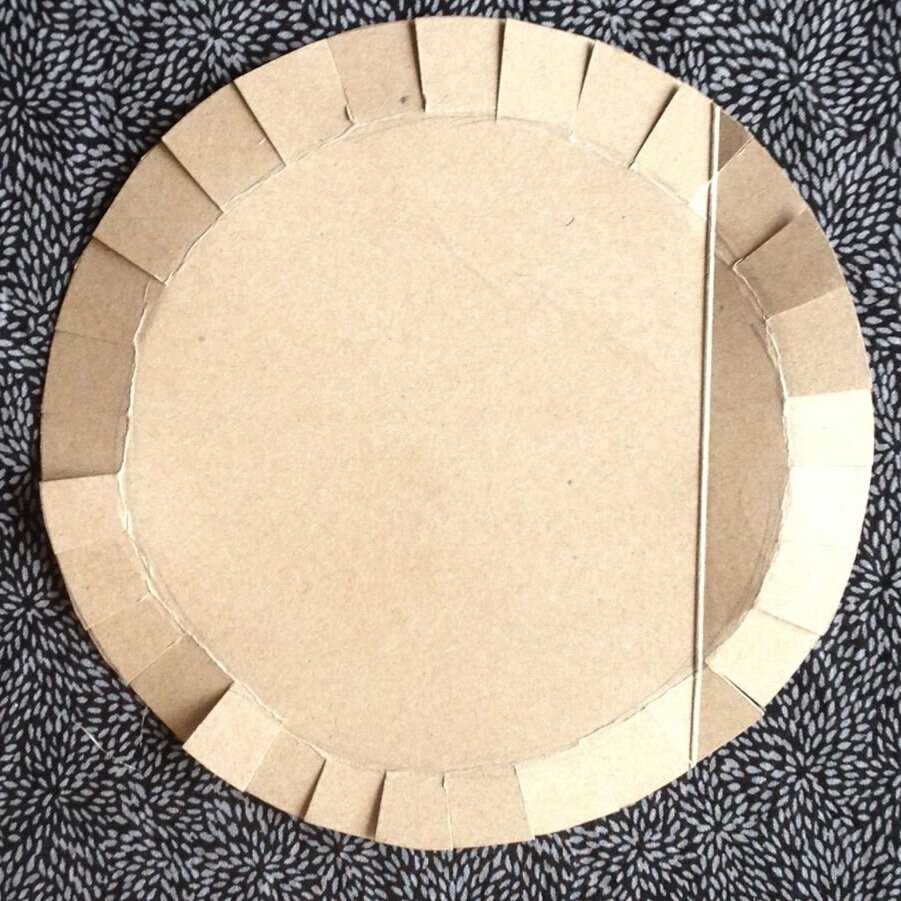
6) Measure circle for top of helmet using the cylinder you just made. Add about 1/2 inch extra all the way around the circle.
7) Cut out circle.
8) Go around the circumference and make 1/2 inch cuts into the circle. This will make tabs all the way around.
9) Fold the tabs down.
10) Fit circle into the cylinder. The tabs will go inside. Tape the tabs inside the cylinder with masking tape. This forms the helmet.
Bouquet Helmet Flower Power

Supplies: cereal boxes + masking tape + scissors + duck tape + tissue paper +wire or pipe cleaners
How to:
1) Open top and bottom of two cereal boxes. Find the side seam on each box. Open up and flatten.
2) Cut off extra flaps.
3) Overlap the two boxes about an inch. Tape the seam with masking tape on both sides. This makes one large piece.
4) Take the piece and wrap it around your head to make a cylinder. Overlap at least 1 inch. You can cut off some if you have too much overlap. Tape with masking tape inside and out. (For larger heads you may need more that two boxes.)
5) Cut out one long or two short rectangles for eyes. As an option, you can cut a piece of clear plastic and put it inside the helmet over the eye openings as a shield.
6) Measure circle for top of helmet using the cylinder you just made. Add about 1/2 inch extra all the way around the circle.
7) Cut out circle.
8) Go around the circumference and make 1/2 inch cuts into the circle. This will make tabs all the way around.
9) Fold the tabs down.
10) Fit circle into the cylinder. The tabs will go inside. Tape the tabs inside the cylinder with masking tape. This forms the helmet.
11) Make tissue paper flowers. (You can find YouTube instructions HERE.) Make four flowers or design your own bouquet with smaller flowers. Tape to helmet.
Knight's Helmet


Supplies: cereal boxes + aluminum foil + masking tape + invisible tape + glue stick + scissors + X-Acto knife + clear light plastic salad containers to make eye shield + markers + duck tape
How to:
1) Open top and bottom of two cereal boxes. Find the side seam on each box. Open up and flatten.
2) Cut off extra flaps.
3) Overlap the two boxes about an inch. Tape the seam with masking tape on both sides. This makes one large piece.
4) Take the piece and wrap it around your head to make a cylinder. Overlap at least 1 inch. You can cut off some if you have too much overlap. Tape with masking tape inside and out. (For larger heads you may need more that two boxes.)
5) Cut out one long or two short rectangles for eyes. As an option, you can cut a piece of clear plastic and put it inside the helmet over the eye openings as a shield.
6) Measure circle for top of helmet using the cylinder you just made. Add about 1/2 inch extra all the way around the circle.
7) Cut out circle.
8) Go around the circumference and make 1/2 inch cuts into the circle. This will make tabs all the way around.
9) Fold the tabs down.
10) Fit circle into the cylinder. The tabs will go inside. Tape the tabs inside the cylinder with masking tape. This forms the helmet.
11) Measure and cut aluminum foil to cover the helmet.
12) Use invisible tape to secure the aluminum foil to the helmet.
13) Cut out decorative shapes to add to your helmet and cover them with aluminum foil. Tape to helmet.
Morning Spider Web


Project inspired by the spider that makes a web every spring in our doorway.
Supplies: copier paper+scissors+Grinnell Herald Register
How to:
1) Tape 6 pieces of copier paper into a rectangle or use a full sheet of newsprint.
2) Beginning at one end, make a first fold 3 inches in. Then continue folding the entire rectangle. You will end up with a long folded paper about 3 inches wide. Do not fold like you would a fan.
3) See Photo: Starting at one end alternate cuts back and forth that are 1/2 inch apart. Cut close to the fold but don't cut through.
4) Carefully unfold one layer at a time.
5) Pull sides to form the web.
6) Place in a window or wear as a fancy cape.