

Alesia’s Art Activities
Alesia Lacina has a long history of arts education in Grinnell. Here are some of her favorite art activities for you!

Artist Biography Books
Artist biography books are a fun way to teach kids a little art history. These books contain a short biography of an artist to read aloud, an example of their work, and the bookmaker's interpretation and impressions of the artist.
We make one book about each artist, Pablo Picasso and Henri Matisse. We used photocopies of a book's (see Sources below) biographies and painting examples which were then cut out and glued to the book pages. Tweak this project to your heart's content, though. Two ideas are to make one book including both Picasso and Matisse, or include little biographies about other artists.
Materials
Several sheets of construction paper (depending on how many pages you want in your book)
Paper scraps or drawing materials
Stapler w/ staples
Glue sticks
Print outs of biographical information, Picasso painting example, etc. (See Sources or click image at bottom for PDFs)
Instructions
Fold a few pieces construction paper in half (short end to short end) to serve as the outer cover and pages of the book. Tuck them inside each other and staple along the inside crease.
Using the example painting as a model, decorate the cover in the style of Picasso. Using the paper scraps makes a more interesting visual than markers, but use anything.
Cut out and paste the biography and painting example inside the book.
On the last page, write your thoughts about Picasso - do you like his art work? How did you use his ideas/style in your own artwork on the cover?
Source
Book: " What’s the Big Idea?: Activities and Adventures in Abstract Art” by Joyce Raimondo
- For more artist biographies, check out these websites:

CLICK THE IMAGE ABOVE FOR PRINTOUTS

Many Pointed Star
Materials
- Triangle pattern printed on cardstock (PDF below)
- Duct tape or paint & brushes
- Masking tape
Instructions
- Cut out the triangles on the pattern. There are 30 triangles per page. You will need 60.
- Tape three triangles together to make 20 pyramids (without bottoms).
- Tape two sets of five pyramids together along bottom edges.
- On both sets, tape five more pyramids on the edges.
- Reinforce all the edges so that the star is solid.
- Cover the star with duct tape or paint.
Tips
- Make sure there is plenty of tape on the edges so the star does not fall apart.
- It helps younger kids to have cut out for them.
- This project takes a lot of time.

CLICK TO PRINT PDF
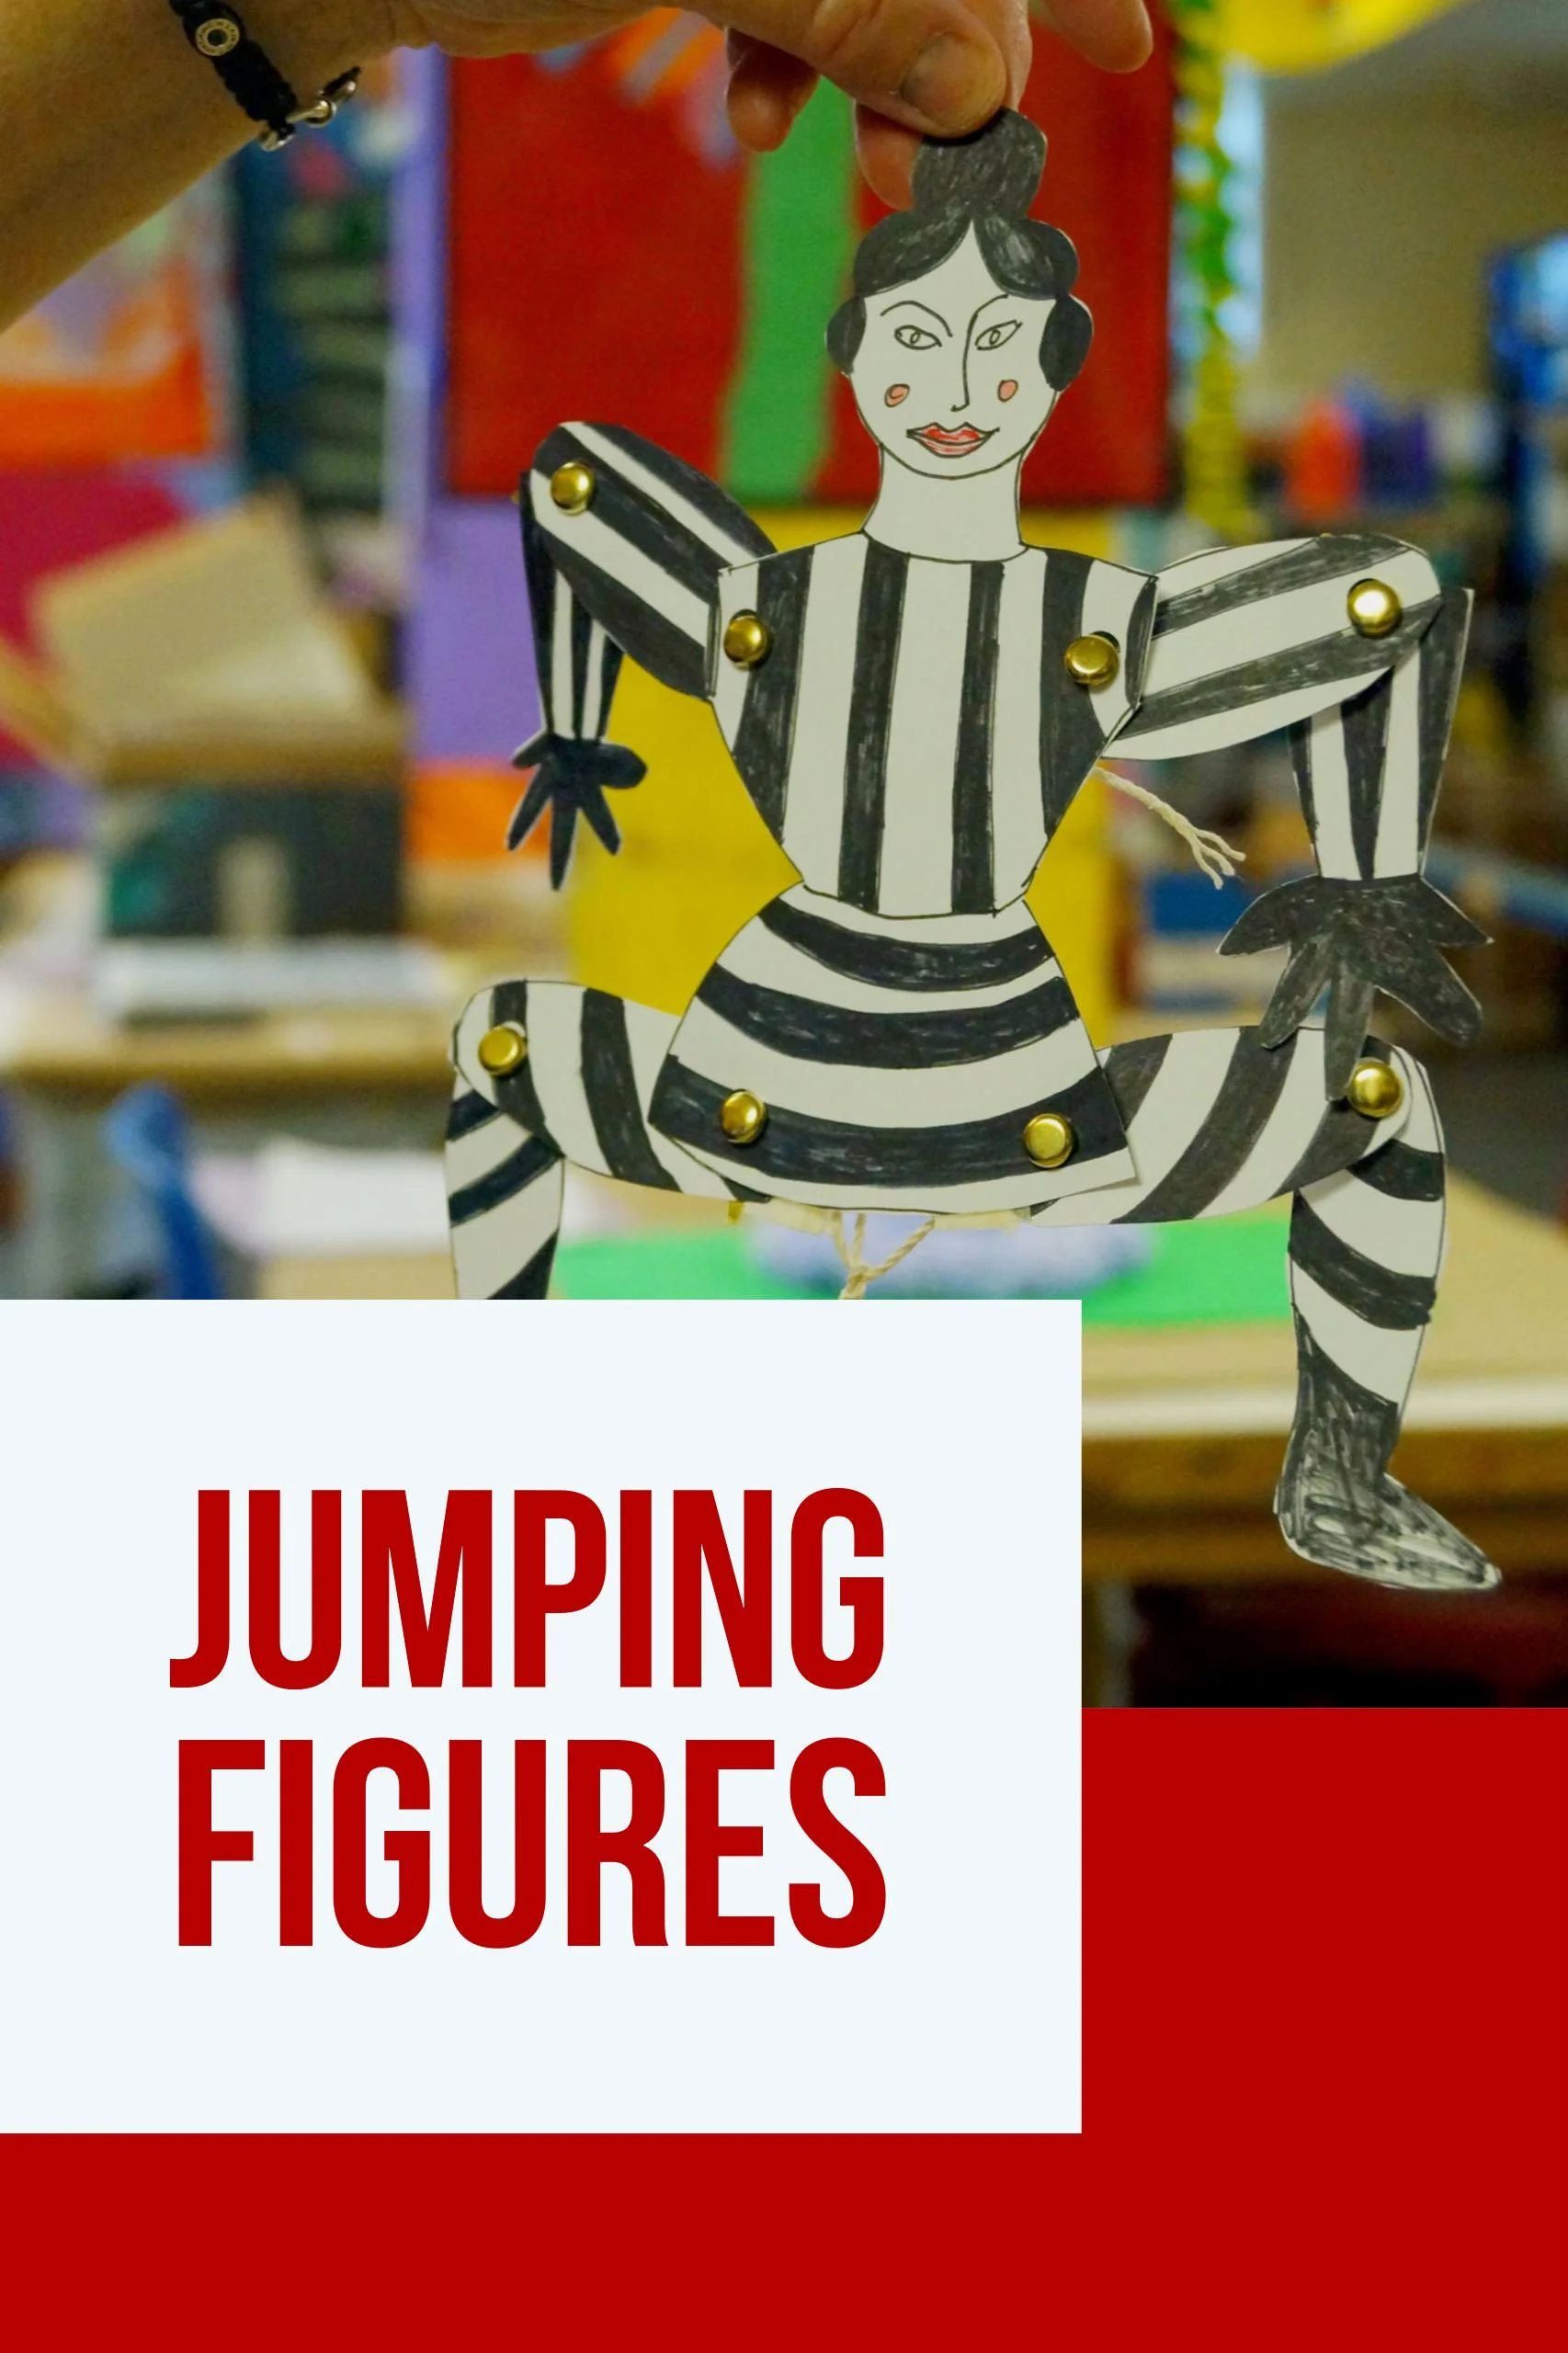
Jumping Figures
The puppets made in this project are fun to play with, but making them can be tricky for kids and adults alike. Hopefully, the steps below will help make the process easier.
Materials
- Cardstock
- Scissors
- Tape
- Paper fasteners
- Thin string
- Hole punch
- Markers
Instructions
1. Cut out shapes from the cardstock to act as the legs, body with head, and arms of an animal/creature/alien. Decorate with markers.
2. Punch a hole in each limb where it will be attached to another body part.
3. Arrange the limbs underneath the body. Attach the limbs and body together by poking paper fasteners through the holes from above and opening the fasteners to lock. Keep the paper fasteners loose, though. The limbs won’t move easily if they are tight.
4. On the backside of the puppet: tape a piece of string across the top pair of limbs, in this case, the arms. The ends of the string must be taped above the paper fasteners for the puppet to work. The string should not be very loose. Trim to size. Repeat for the legs.
5. Take one long piece of string. Tie one end to the center of the string connecting the arms. Tie the string again, but this time around the center of the leg-connecting string. Leave the other end hanging down. There is no specific length the string should be. It will all depend on the size of your puppet. However, when the limbs are down, the string connecting the leg and arm strings should not be slack.
6. To use, hold the puppet from the top and pull the string down. The limbs will move up.
Tips
- Students found this project relatively difficult, and needed help figuring out how to join the pieces of cardstock together.
- Keep the pieces, especially the limbs, wide. Kids like to cut them so narrow that a hole can’t be punched in them.
- These instructions are based on a 4-limbed puppet. We found any more made the moving of the limbs particularly difficult.
Sources
- Book: "Get Creative with Paper" by Paul Jackson and Angela A'Court
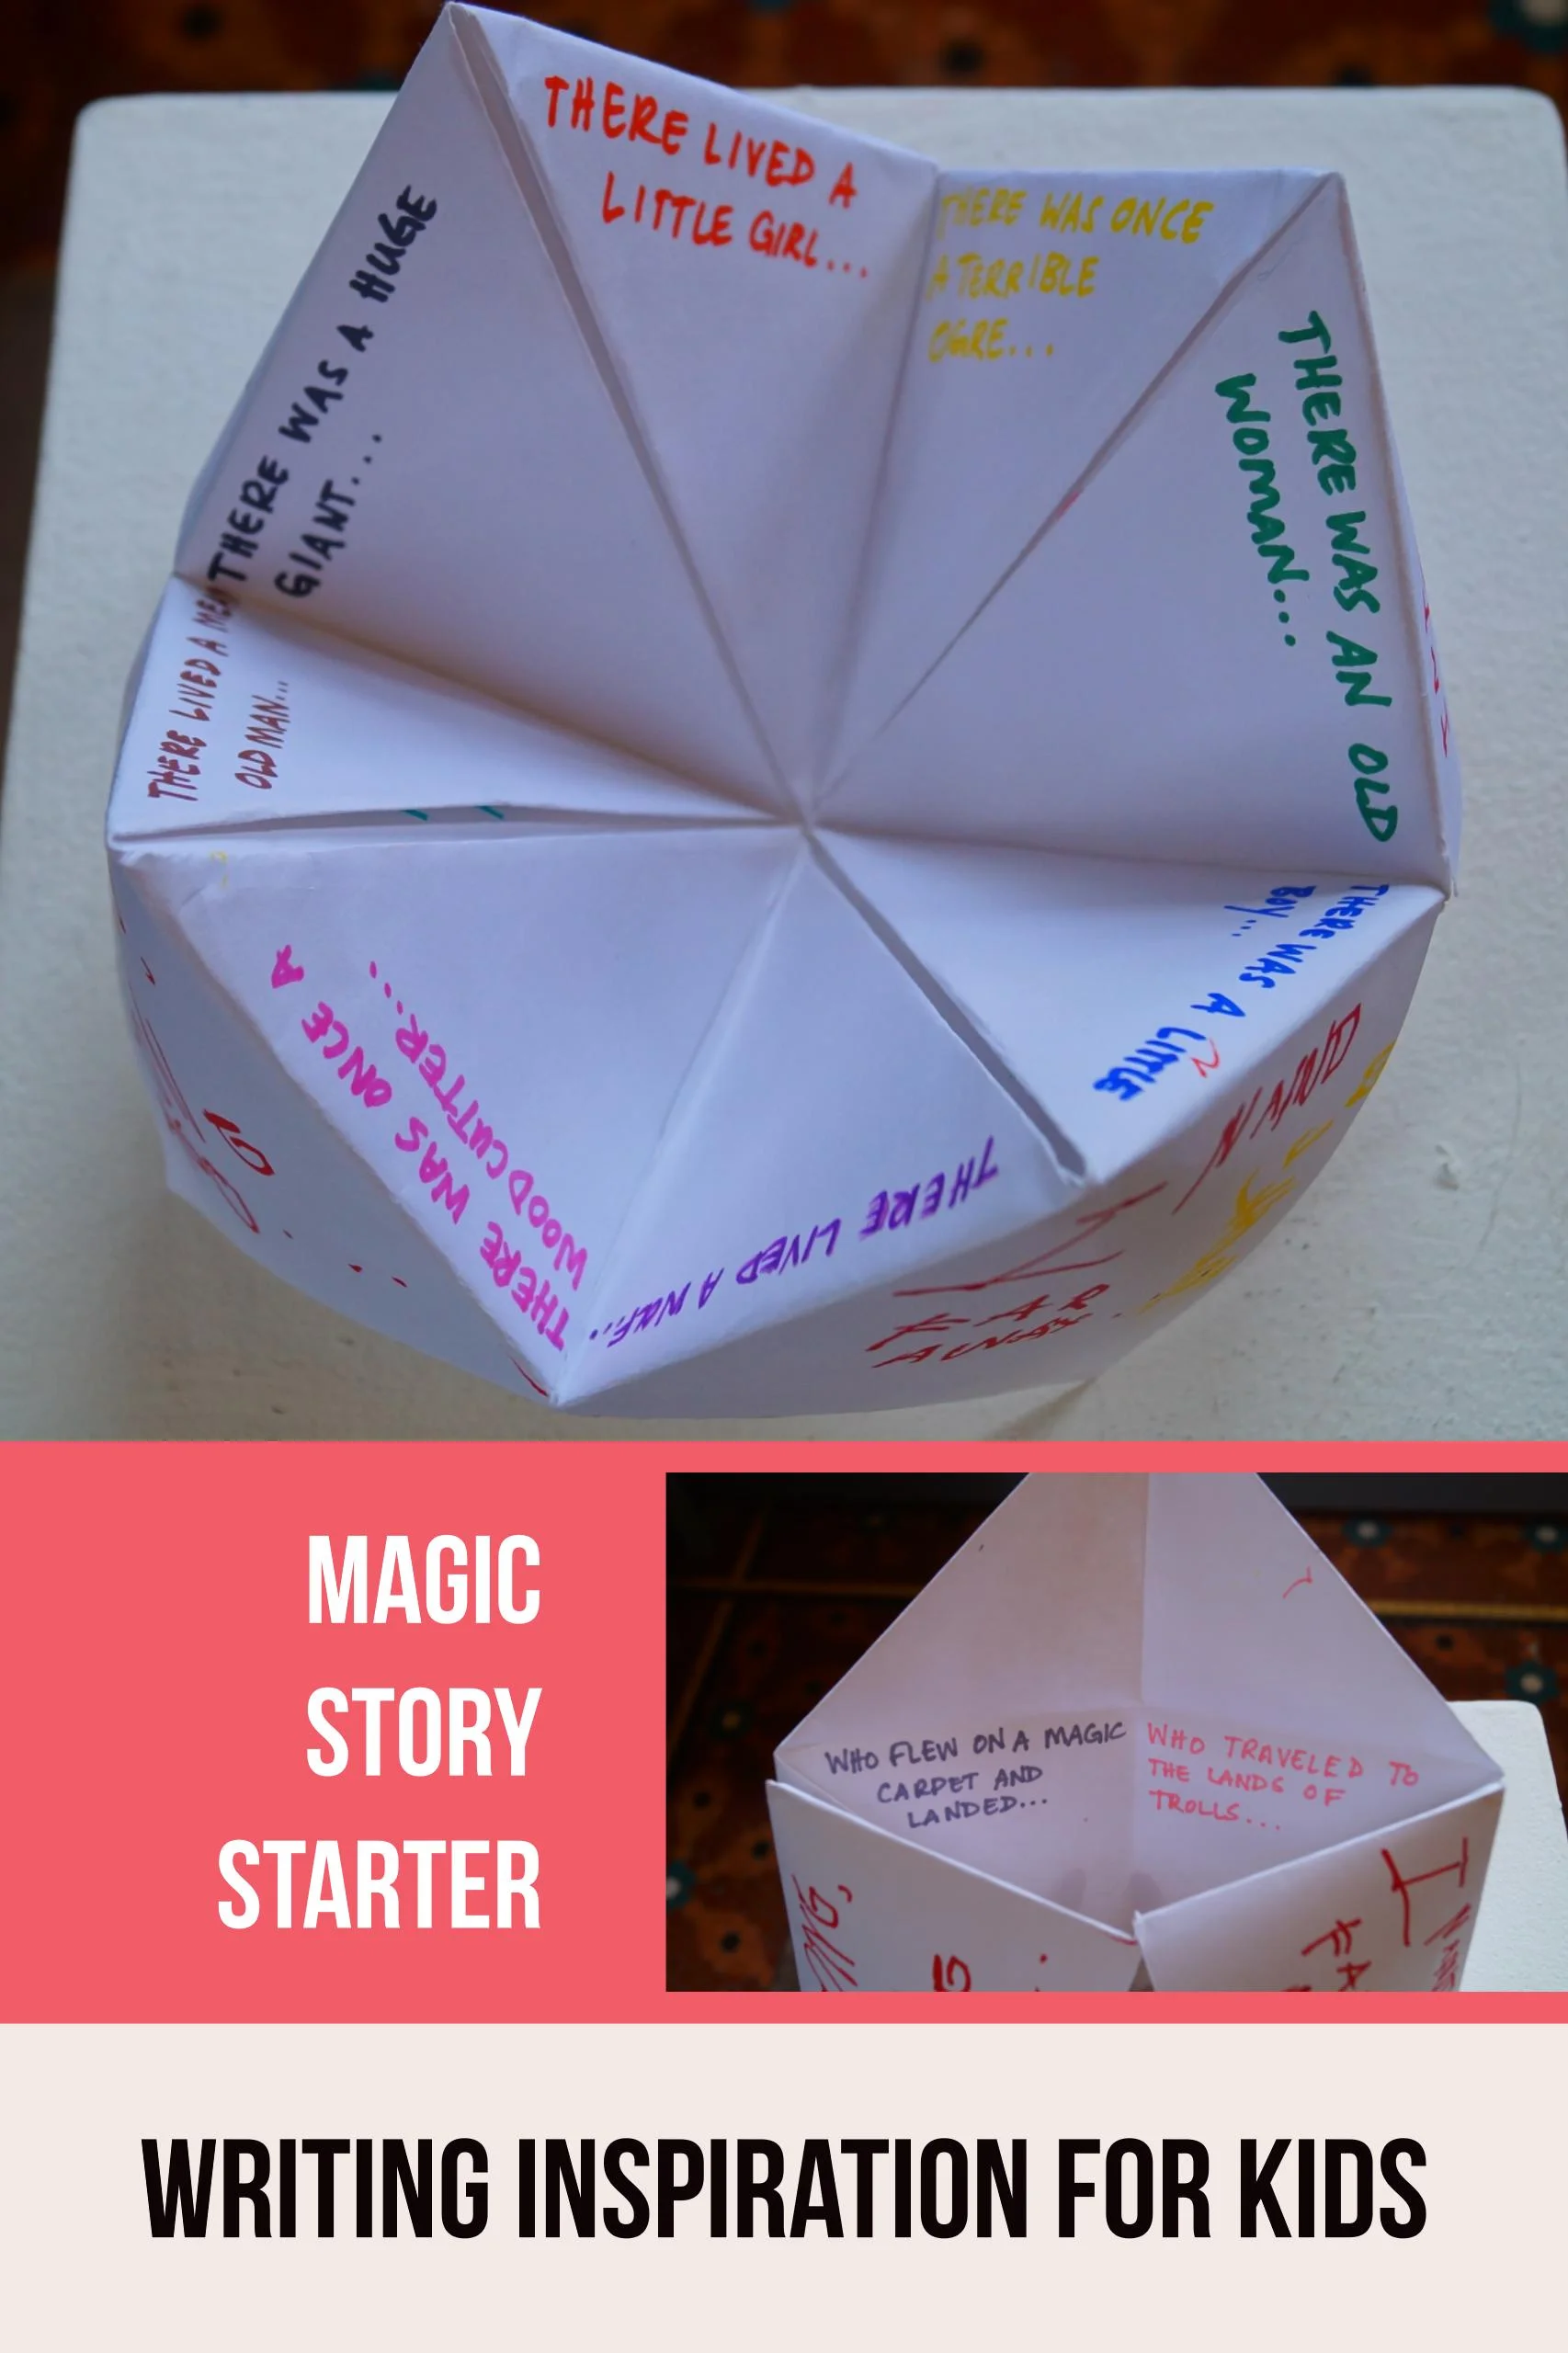
Magic Story Starter
This may seem like an intimidating project if you've never made a fortune teller, but it is fun. And it's a great way to get kids writing! In case of confusion, we added lots of pictures. Still, if you have trouble, don't feel bad! There are many different tutorials on the internet for more help.
Materials
Large square pieces of white paper
Pencils/markers
Instructions
- Fold paper like a fortune teller.
1a. Take a piece of paper and fold it in half, corner to corner. Unfold and repeat with the other corners. You will end up with 2 diagonal creases.
1b. With the paper unfolded back into a square, fold each corner into the center. Do not unfold these.
1c. Flip over. Fold each corner into the center again.
1d. Fold in half to make creases again. These should be horizontal and vertical, though.
1e. With the paper open facing up now, slide one hand underneath into the pockets on the bottom. Place your thumb in one pocket, your fingers in another. Do the same with your other hand. Bring all the points to the middle.
2. Have the kids write the very beginnings of a story on the outer four squares of the fortune teller (ex: Once upon a time..., Long long ago..., Deep in a forest...).
3. On the middle eight triangles, introduce a main character (ex: there was a little boy..., there was a baby dragon..., there was a beautiful princess…). Number each triangle as well.
4. Flipping up one of the flaps of the middle layer reveals the final, third layer. On this layer, write an action on each triangle that corresponds to the character on the middle layer triangle above (ex: who walked through a magic door and found himself in..., who was just learning to fly, when..., who picked an enchanted flower that...)
5. To use the story starter, have someone choose a story opening. As you say each word aloud, flap the fortune teller open from side to side. Once for each word. Next, have someone choose a number from the visible triangles. Flap the fortune teller open from side to side however many times the number indicates. Finally, have someone pick another number from the four visible triangles to determine a character. Lift the flap to reveal what the character does. At this point, the kids can write their own stories with the story beginning given.
Tips
Letting the kids make up their own characters and actions makes it more fun for everyone!
A story could be written as a group or individually.
Outer squares of the fortune teller: story opening
Middle triangles of the fortune teller: introduction of a main character (we forgot to number them, but you should mark yours)
Sources
- Book: "Handmade Tales: Stories to Make and Take," by Dianne de Las Casas
Cutouts
2-color cutouts
Materials
- Multi-colored paper
- scissors
- double stick tape and/or glue sticks
Instructions
Fold one piece of paper in half any way, corner-to-corner or end-to-end.
Still folded, fold in half again.
Using scissors, cut out shapes as you would to make snowflake, being mindful to leave the general size of the paper the same.
Tape or glue the cut out to another piece of paper.
To make a cutout with more than two colors, repeat steps 1-3 and glue each additional layer onto the first paper.
Tips
Encourage as much cutting as possible! The more cut out, the more interesting the final product will be.
This is a great way to teach kids about complimentary colors.
3-color cutout
3-color cutout